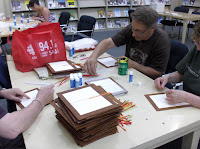
Using a book broth base, adding the savory of whimsical observation, and stirring well.
Showing posts with label binding tips. Show all posts
Monday, May 7, 2012
backup plan
Friday, July 15, 2011
spinal separation
Easy breezy repair and a most important one. In hard covers the text block likes, on more occasions than the book-brother authority would like to admit, to make a break for it now and then. We have no idea why text blocks feel the need to break free of what protects them from a hard wear world, but the burden of the cover just seems to become too much all of sudden and they lean out, unclenching the glue attachments and list toward all out freedom. If you can catch them in this partially escaped state, you can save yourself a lot of work. Pleasurable work, but work non-the-less.
Get your glue ready, in a little puddle on a plate or some such item. Get your glue brush ready. This is a paint brush that is either in retirement, or was crafted by people who believe paint brushes should be disposable in quality. Make sure your glue brush has a long handle and is not very big in the bristle department. A size one is a good bet. Not too big and not too small for the job. Just like porridge. Spread the spine and cover open as in the picture, exposing the areas in need of fresh glue. Swipe up a dollop of glue on the brush, hold it over the opening with your hand near the brush, and, with practiced timing, let go, then just before it lands on the desk below, catch the handle again and paint the glue all up the inside edges of the spine where the boards and the end papers should be attached.* Put the glue brush in water. Lay the book on its spine with the covers flat on the desk and gently press the end papers back into place. Close the book, lay it flat and drop a brick on it. Gently. Leave it until the glue dries. Done.
*I have tried the method where you pour the glue down inside the book along the edges of the spine, but that generally ends up with smears of glue along the shaft of the glue brush. If you don't mind cleaning that up, or don't care if your glue brush is caked with dried glue, go for it. Not that I would admit to being fastidious in anyway. And not that anyone who has seen my work station while I am in the middle of a project would think it. But I generally do it the other way.
Monday, July 4, 2011
spinal injury
Friday, June 24, 2011
100 handmade books aftermath
Wow! The launch for the Book of Days was on Tuesday evening. There was food from the recipes, music from a harpist and her guitar playing husband, a whole host of friends and well wishers. And purchasers. The book sold out completely. Okay, okay, not all on Tuesday, I spent Monday and Tuesday offering it to everyone I came into contact with, with great success. I collapsed Wednesday to recover from several months of drawing and three weeks of stitching and gluing. Imagine if you will a whole day of doing only as my whimsey takes me.* Ahhhh.
I did take my camera, but I was so involved with telling people what food came from which recipe and visiting and all, that I didn't remember it till we were packing up. You will have to use your imagination. It is a surprising tool. Just try it. Close your eyes. You are in a low ceiling room, with paintings all around the walls (local artists), there are couches, and many mismatched tables and chairs. The harpist plays medieval music with her husband. There is a counter top and a table full of food dishes. You are invited to dine. Inhale the scent of the clam spaghetti sauce, look at the thick caramel on the top of the fudgey wedgy squares. Have a small taste of the Post Reformation yogurt....chat, laugh, eat well.
* bonus points to those who recognize the quote.
Tuesday, June 21, 2011
Tippin'in
When your pages are falling out. More to the original point, when a page or two falls out. I have never seen anything quite like this Sask. Report. And not even all the pages that were loose made it into the photo. The procedure for tipping in is to lay down a line of glue, dip the inside edge of the page into the glue, and gently slide it into place. The correct place. Always be sure of that before you make contact with the glue. Right page in page order, right side up, and right side to the outside. All the fun you can have with a single sheet of paper. Amazing isn't it.
The last step I did on this Sask. Report was to turn it upside down and shake it. After the glue had dried. There was no other way to be sure I had found all the pages that were slipping out.
Tuesday, June 14, 2011
100 handmade books


If you are around, come on out for the launch, June 21st (ah summer, when the days are getting shorter) at 8pm, the Refinery 609 Dufferin, Saskatoon. There will be food.
Monday, June 6, 2011
Inside the cover
When the endpapers on a hard cover splits I was taught to use gummy binder tape for the repair. It is fully functional, but looks less than stellar. In fact as time goes on it looks worse and worse, like a hobo with patched pants. White pants, patched with brown plaid. Soooooo, being an enterprising, and over keen little thing, I kept my eyes out for a substitute that might meet my exacting needs. Change being what it is, I was soon rewarded with a pile of discarded legal texts; the kind they make by the row for beauty of conformity, and then update, with more beautiful conformity. They also indulge in several blank pages front and back of the actual word portion of the event to demonstrate, hummm, wealth? extravagance? generosity to my book repair needs? Must be it. My cutting tool in hand I extricated the pages, and in several cases ribbons and decorative spine endings too, but that's another story.
Clean off any rough bits from the broken endpapers, cut a nice piece of your rescued paper, mind the grain, and glue it over the gap. Instead of greyish, hey look-at-me-I-am-a-repair, you get a tidy, I-am-elegant-and-decorative look. On my own budget I have been known to get a variant colour and use that, which naturally enhances the decorative look of the repair.
Monday, May 30, 2011
finding your page
Today we deal with the consequences of the 'children' who find the trip to the photocopier so onerous that they just have to rip out the page(s) they need for their work. In that case there is nothing to do but contact another library and get replacement pages. However they often come single sided; makes for a tight fit, twice as much paper in a narrow space. But with the coming of double sided printers, scanners, and my personal fave, Photoshop!, a much more pleasing outcome can be attained.
Working in Photoshop it is especially easy to line up your back to back pages by having them on different layers, changing the opacity of the top layer and moving it into alignment with what is now visible below. You can also clean up all the ugly edges and black photocopy dots that come from the pages faxed over to you.
Thursday, May 26, 2011
Paperback novel part lV
Notice how agile I am with Roman numerals? Since this was a single strip new spine, and not a whole new cover, or wrap around spine, I added tape. Clear heavy duty tape. Regular packing tape isn't thick enough. Keeping your fingerprints off it is the biggest challenge. I like to lay/lie the book down on my gridded cutting matt. That way I can use the lines to guide me into placing the tape on straight. Run a bone folder, or plastic spatula like tool such as in the picture, to make sure there are no air bubbles and the tape is firmly attached. Then I flip the book over and starting in the middle use my thumbs to press the tape evenly onto the spine. Pull it over onto the back cover in a similar manner and smooth out the tape with the tool.
To finish off, make a cut, angling inward, from the edge of the tape to the edge of the text block at the point the cover opens away from the pages. Fold the tape around the cover top and bottom front and back, then cut flat to the spine ends the remaining tape.
Volia, she's done.
To finish off, make a cut, angling inward, from the edge of the tape to the edge of the text block at the point the cover opens away from the pages. Fold the tape around the cover top and bottom front and back, then cut flat to the spine ends the remaining tape.
Volia, she's done.
Wednesday, May 18, 2011
Paperback novel part lll

You are now ready to apply the new spine art that this time you did not need Photoshop for, but rather just a word processing program from the competition. You know the one I mean. It does this kind of simple design quite nicely. Though I prefer to scan the original spine in if I can, it was in this case a wreck and I had to improvise. As I said in part 1, remember to keep the original call number tag if you are doing this for a library.
Remember to apply the new spine first and then the call number tag. Or you will never find the silly thing again, that's if its shelved in the right place in the first place. And you guessed it, you put more glue on the spine and then put the spine on top. Clever you. Print your spine from a lazer printer. Ink jet blends with the wet glue and looks less than professional.
Friday, May 13, 2011
Paperback novel part ll
Working with the glue and the special tool. Once you get the text block all banged down so all your front, top and bottom, surfaces are even and you have secured same with the totally illegal elastic/rubber band, place the block between two sturdy objects. I only have one brick left (don't ask)so for this I will use discard legal volumes.
Then apply the first layer of glue. And voila, the special tool. Handy, works in concert with other like tools to accomplish endless other functions (don't ask), and is completely washable. Will not shrink in the dryer. (Remember the hanny dryers when you were a kid, when your mom would hold out the towel for you to put your hands in and then she'd rub them quick and silly?) Use the special tool to spread the glue evenly over the spine of the text block. This tool is the best one I have ever found for this work.

Let the glue dry a bit with the text block in the upright position, which allows it to nestle a bit between the pages, then squash it. Bricks are great for this.
Friday, May 6, 2011
Paperback novel part 1
This book came back split in half. I could have stuck some tape on the spine and plastered some tape down the middle, creating a hinged book, but I decided I would use it to show you how to repair a paperback. The first step I did not actually catch on film. Very shy paperbacks are during early surgery. Strip off the paper of the spine. Library people, its good to save the call number tag if you can. Then shave off all of the old brittle glue. You can damp it, it helps to keep the dust down. When you are done and each page is separate, DO NOT shuffle them like a deck of cards. Unless you are trying to cause the Head Librarian a nervous breakdown. Instead, bang the pages down as a whole, onto the front of the text block as shown below. If you look closely in this picture the front few pages are shorter than the rest of the block. This will disappear into the spine, but if you bang to the spine the front of your book will look, well, like crap.

Wednesday, April 6, 2011
Apprentices welcome
For all and any interested in the deep and secret Sisterhood of Book Repair Persons*, please be aware of an upcoming introduction to bookbinding, brought to you by a Happy Leopard near you. Willing victims will be shown the basics of book binding and assist in the production of 100 handmade books for charity. Mark your calendars for early to mid May. A date will be set. You will be sent a secret signal, if only you let us know where to signal you.
Useful tool for the aspiring junior book repair person working alone: the self healing cutting matt. Available for prices as low as $12 (last time I checked) for 18x23 inches at the ever handy University Bookstore.
*boys are allowed, but they must wear kilts :-)
Useful tool for the aspiring junior book repair person working alone: the self healing cutting matt. Available for prices as low as $12 (last time I checked) for 18x23 inches at the ever handy University Bookstore.
*boys are allowed, but they must wear kilts :-)
Wednesday, March 30, 2011
avoiding a sharpie: part 2
If using the original spine is not an option, and creating a matching spine is not possible...forgot to mention last time that using a lazer printer is greatly to be desired when printing a replacement spine...you can write onto the book tape used to replace the spine. In this image I have used a calligraphy dip pen and white acrylic paint. The paint needs to be watered a bit, but only a very little bit. I dipped the nib into water then stroked it through the paint a couple of times to get it the right consistency. If you want a thicker line the bookstore on campus sells dip nibs; they were about 50 cents last time I got some. The pen holders are not to much either (slightly less stylish than the one in the picture, a Christmas gift from my brother). And Walmart sells cheap acrylic for about $2.00 a bottle. I used Golden, but I am in the middle of a painting and it was on the palette.
Tuesday, March 29, 2011
avoiding a sharpie: part 1
The question came to me, what to do when the water doesn't work. Which happens. Sometimes the orginal spine is just to delicate. Sometimes PMS gets the better of you. You need a new spine to decorate your newly repaired book. I present the wonderful world of scanners and photoshop. The first image has only a bit of photoshop work, extending the green with the duplication tool. The orginal spine was worn and rounded on the edges. I admit I didn't even try to get it off. The second one, okay, I am obssesive. Don't worry, I was a home when I did it.
Thursday, March 24, 2011
repairing with water
I use water in my book repair work. When the spine needs to be replaced it is common practice to take the title and call number portion of the spine and glue it onto the new spine. That works best when the cardboard backing of the original spine is removed. Brush with water and wait.
Tuesday, March 1, 2011
The visual mull
Apparently my presentation lacked clarity. :-(
The mull is the material used to attach the text block to the hard cover case in book binding or repair. In the repair job photographed above, white linen was used. As my presentation notes, other material can be used, such as your husband's jeans. Be sure he is not in them when you cut them up. This white linen is from a towel once owned by my grandmother, or great grandmother, or great great....yeah, they kept everything, and linen is good for into the hundreds of years. The mull is glued to the spine of the text block and then its flap edges are glued to the front and back cover of the book. It is this design which enables you to put the fine spacutla down inside the spine of the book to attach the tattle tape.
Subscribe to:
Posts (Atom)